Archive for the ‘FRP Wall Panels’ Category

FRP wall panels are great for protecting walls in mud rooms, shops, bathrooms – basically anywhere you need easy-to-clean wall protection. However, it’s not just as simple as nailing in a few sheets of panel, you will need to plan ahead for your project.

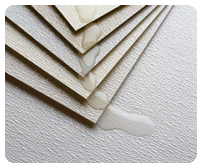
We recommend you get some graph paper first and get some measuring tape. Go to the room you’re going to put the sheets into and measure the width of all the walls. Make notes of how many inside or outside corners you have in the room at this stage. Now note that the FRP wall panel sheets are all going to be 4′ x 8′ or 4′ x 12′ in size. How are you going to orientate them? If you need only coverage right near the floor, you could potentially put the sheets sideways to save on the total the amount of sheets you require. Sketch that onto your graphic paper because you will need to know how many sheets to put on a given wall. The reason for this is that you require dividers (known as ‘j-trims’) for the spaces between the panels on a given length of wall.

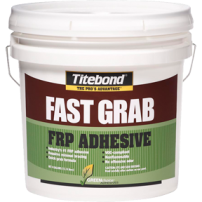
All j-trims, inside and outside corners come in 10′ lengths. You need to consider that you may need extra of those to cut-to-size to fit into your project. Lastly, you need to consider FRP adhesive. Many jobs are not actually done by nailing in FRP panel to the wall. Instead a special FRP adhesive is used that comes in 4 gallon buckets. Each bucket covers 200 square feet of surface area. Based off of 4′ x 8′ panels (32 square feet) or 4′ x 10′ panels (40 square feet) add up the total square footage of your panels divided by 200 and then round up…That’s how many buckets of FRP adhesive you require. Also factor in you will want to have a trowel to spread the adhesive onto the panels.

At this point you should be ready to quote! You now know 1.) how many panels you need 2.) how many j-trims/inside/outside corners you need along with 3.) required adhesive. You’re set to purchase the material and get started!


FRP wall panels are a great product for the DIY community. The panels are strong, long-lasting, grime and vandalism resistant. Excellent for applications such as bathrooms, garages, “mud rooms”, or areas animals are kept. FRP wall panels have a relatively economical cost compared to industrial FRP panels, are widely available, and easy to install. As with any project, preparation is key to saving money and prevent disappointment with the final result.

To start the first thing you want to do is draw a quick sketch of the area to be covered. Mark each wall with how many feet it is in length. FRP wall panels come in 4′ x 8′ and 4′ x 10′ panels and the next thing you need to do is figure out how you will orientate the panels. Start at the floor – will they be arranged to provide more height by being set side-to-side by their width? or by their length to provide 4′ high coverage? In many applications, the panels can be placed on their side to cover more area and reduce costs. You should now be able to figure out how many panels you need.

Next, figure out how much FRP adhesive you need. The adhesive comes in 4 gallon buckets and covers 200 square feet. simply add up the total area of the panels you need and divide by 200. For example, if your project requires 12 4′ x 10′ panels that is 480 square feet / 200 = 2.4 or 3 buckets of adhesive will be needed. It’s always good to have some extra so never round down!

Following this step you need to figure out how many inside corners/outside corners/j-trims you need. Inside corners and outside corners are PVC plastic dividers for FRP wall panel that are purchased alongside the panels. This is pretty simple as you just count how many corners you have. The trims and corners all come in 10′ lengths. The j-trims require a bit more thought. These are also PVC but are used to join two panels where there are no corners. You need to be able to sketch or visualize where your panels will buttress up against each other along the stretches of wall and be able to count up what you need.

And that’s pretty much it! At this point you should have a clear idea of the scope of your project and all the requirements for your FRP panels and how many accessories you need. The next step is to simply contact your plastics distributor and request a quotation. Please give clear and specific requests including relevant quantities for all required components. That will ensure a quick and accurate quotation.


FRP wall panels are a great project for the DIY enthusiast. These panels come in 4′ x 8′ or 4′ x 10′ size, usually in white with a “pebble-embossed” surface. They provide wall protection and are designed to be easy to clean (non-porous surfacing and the pebble texture helps with that). But before you start you need to get the project in order. Here are the questions you need to ask yourself:

1.) Do you have the right amount of dividers (j-trims) and inside/outside corners?

This should be common sense but when you buy the panels you need to get the plastic dividers too! J-trims divide the panels that are side-by-side, while the inside and outsider corners link at, you guessed it, the corners. Knowing the room(s) you’re working on and the size of the panels will help you determine what you need.

2.) Do you have the right amount of adhesive?

What we mean here is the special FRP glue. If you’re fixing the panels another way than obviously you don’t need to think about this but most people do use the adhesive and each bucket (4 gallons) covers 200 square feet. We usually recommend you buy a little extra to ensure you can spread the adhesive liberally. It just takes a minute or so of simple math.

3.) Is the surface clean?

Just because FRP wall panels have a special adhesive does not mean it’s so strong that you just slather it on any surface and slap the panels on. Even though the panels can be affixed to a wide variety of surfaces (including concrete!) The surface still needs to be clean. This means “clean, clean” so deburr it or sand it flat than wash the surface clean and let it fully dry before attaching the panels. Failure to do this could mean the panels do adhere properly or even detach. You would think it makes common sense but people don’t always do it.

Asking yourself those three simple questions will go a long way in ensuring your project is a complete success!

frp-wall-ceiling

FRP_TextureFRP (fiberglass reinforced plastic) wall panels have a distinguished history of use in restaurants, convenience stores, public pools, schools, anywhere low-cost and easy-to-maintain wall protection is needed. The most popular of these panels is probably the white, embossed kind. It has a “pebbly” texture that makes it difficult for grime to stick on and makes the panels easy to clean.

While commonly encountered in businesses, these wall panels have many potential applications for the “diy” home renovator. For example, kids with crayons are a nightmare for many parents as the walls present a canvass ready for art – at least in the child’s mind! Do you have a dedicated playroom? FRP wall panels installed at floor level provide a surface so easy to clean you may encourage your kids to write on the walls! Well, maybe that’s a stretch but the investment in the wall panels will give you some peace of mind, make cleaning easy, and might even lower your blood pressure a bit.

Other potential uses in the home include: bathrooms, workshops, en suite kitchens, basements, carports and likely more. Think of the panels as a “simple armor” protecting your walls in high-risk areas from avoidable damage or disfigurement. The panels are easy to install via a special adhesive or nylon rivets to any flat surface. They are water-proof and impervious to cleaning chemicals. The embossed panels are commonly available in either 4′ x 8′ or 4′ x 10′ sheets both with a thickness of .090″.

For more information click here.

Stop and think for a second. Imagine you are considering a project that will use FRP panelling. Now think about what is important to your installation – what comes first to mind?

Color of the sheeting?FAST_GRAB

Embossed or not?

Do you wonder “How do I fasten this?”

What about the adhesive?

That last question is especially important but might not have come first to mind. The adhesive keeps the panel in place and on the wall and incorrect application of the adhesive can ruin your entire project. In addition, the application of the adhesive is not as simple as “apply and hold” like glue. A few tips…

-Ensure the surface you are putting the FRP sheet on is clean, dry with all holes patched (ok, this one is common sense!)

-Allow the FRP to acclimatize for 24 hours to your room temperature before installation

-Apply the adhesive at 50-90 farenheit

-Use a v-notch trowel

Did any of those above come as a surprise? If so you may find this FRP installation guide useful.

Remember, do your research before you start any project!

E-MAIL: sales@redwoodplastics.com
CDN: 1 800 667 0999
USA: 1 866 733 2684

Following up on our article from awhile back on FRP wall panel installation. We’ve found a video with some decent tips as well, although they certainly push their proprietary brand! Regardless, there is some good information to be had regarding the nylon fasteners, how to seal the gaps between panelling and other general tips. Clocking in at less than 9 minutes – it’s worth a view if you are seriously considering FRP wall panelling.

If you have questions on our FRP or other plastic products please contact us:

E-MAIL: sales@redwoodplastics.com
CDN: 1 800 667 0999
USA: 1 866 733 2684

FRP wall panelingFiberglass reinforced plastic (FRP) panelling is growing in popularity across the world of home improvement enthusiasts. For a time the material provided industry a low maintenance, corrosion-resistant panelling material. With the growth in the availability of FRP, it is now readily available to the general public. As you consider what might be involved in the project we have some tips for you*

Preparation:

you will require gloves, a hat, goggles, mask. You do not want to breathe this dust in or have it go in your eyes! Remember- fiberglass = fiber with GLASS.

-We recommend you having mineral spirits, water and rags available.

-A carbide-tipped saw is virtually required. FRP is extremely abrasive on your saw blades and they will quickly wear otherwise.

Installation:

-Leave a 1/4″ gap between panels and the ceiling. Leave a 1/8″ gap between the panels horizontally to allow for temperature/moisture expansion.

-Holes drilled should also be oversized by 1/8″ to allow for expansion tolerances.

-Recommend you drill holes around 12″ apart if you are working with standard 4′ x 8′ panels.

-Nylon fasteners work well. They are light and easy to use and can be pounded almost flush with the panelling. And they look good too!

-Between the panels (vertically) apply silicon sealant in the joints and seal with a batten strip.

-Allow 24 hours for curing.

If you have questions on our plastic products please contact us.

E-MAIL: sales@redwoodplastics.com
CDN: 1 800 667 0999
USA: 1 866 733 2684

*Disclaimer: the advice provided is not provided by certified builders and provide guidelines, not instructions, on FRP panel installations. Anyone planning on working with the material is advised to do their own research or consult with a certified contractor before pursuing a project.

FRP wall paneling is a popular choice in industrial applications such as hospitals, restaurants, and convenience stores. The paneling is waterproof (when properly caulked), easy to clean, and resists marking. Despite these remarkable properties, FRP wall paneling is sometimes still overlooked when it comes to consumer applications.

Many people have experienced the issues of poor ventilation in a bathroom and the resulting moisture damage. This is especially acute following a home renovation if these moisture issues are not taken into account. Redco™ FRP panels provide a shield against moisture damage and almost as important, they prevent the growth of mold. They’re also tough, shatter-resistant and easily bond to drywall. You may have seen this material already, as OEMs tend to include it with certain shower and bath products.

Working with FRP panels, like with any material, requires a few special considerations:

-The surface the paneling is being applied to must be flush, meaning no screw heads or protruding surfaces.

-Apply the joint compound properly.

-Make sure all seams are adequately caulked. Use a mold-resistant caulk.

-Use plastic rivets if drywall expansion is a concern.

-Ceiling applications require additional support.

Many resources are available online to assist you in the installation of your FRP paneling. We encourage you to look into it, and discover the remarkable properties that merit it serious consideration for your next home improvement project. Good luck!

For further information on Redco™ FRP panels, please check out our website’s dedicated page here: http://ow.ly/eO7so

Feel free to contact us anytime.

E-MAIL: sales@redwoodplastics.com
CDN: 1 800 667 0999
USA: 1 866 733 2684

frp-wall-protection
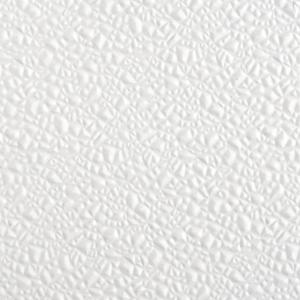
Although Redco™ FRP Panels are traditionally used in food processing plants, hospitals and restaurants, they also can be used at home to protect your walls from the scratching claws of pets and active children wielding felt tip pens.

In high traffic areas such as mud rooms, playrooms and entrances/exits where pets are eager to go outside and children do what they do, plastic walls will protect drywall from dents, scratches and general wear and tear.

Redco™ FRP Panels are available in a variety of sizes and colours to complement your home and are made of an impact absorbent material that is easy to clean and looks new for years.

Visit Redwood Plastics for more information on FRP Wall Protection.